


Synchronize Calendar & Contacts: CalDAV and CardDAV Setup
With CalDAV and CardDAV, you can synchronize your email account's calendars and contacts across various devices. This ensures that appointments, address books, and contact information remain as consistent and up-to-date as possible on your smartphone, tablet, computer, and in webmail.
This article explains what CalDAV and CardDAV are, where to find the required login credentials in webmail, and how to set up calendars and contacts on common devices such as iPhone, iPad, Mac, and Thunderbird.
Briefly explained:
CalDAV synchronizes calendar data such as appointments and events. CardDAV synchronizes contacts and address books. Both protocols help to centrally use calendars and contacts across multiple devices.
What is CalDAV?
CalDAV is a synchronization protocol for calendars. It allows you to sync appointments between webmail, mobile devices, and desktop applications. For example, if you add an appointment on your iPhone, it can subsequently also appear in webmail or on any other connected device.
CalDAV is particularly suitable for business calendars, personal scheduling, project appointments, and collaborative workflows where schedules should not be stored merely locally on a single device.
What is CardDAV?
CardDAV is a synchronization protocol for contacts. It allows you to synchronize address books between webmail, smartphones, tablets, and computers. New or updated contacts are thus available on multiple devices, provided they are correctly connected to the same account.
CardDAV is helpful if you want to manage business contacts centrally and want to avoid important phone numbers or email addresses being saved only on a single device.
Prerequisites for Synchronization
For the setup to work, you need an active email account within your hosting package as well as access to webmail. Furthermore, the device or application you use must support CalDAV or CardDAV.
- Active email account: The full email address usually serves as the username.
- Password: Use the password of the respective email or webmail account.
- Server address: You can find the required address in the calendar and contact configuration inside your webmail.
- Internet connection: An active connection to the server is required for synchronization.
- Supported application: The device or program must support CalDAV and/or CardDAV.
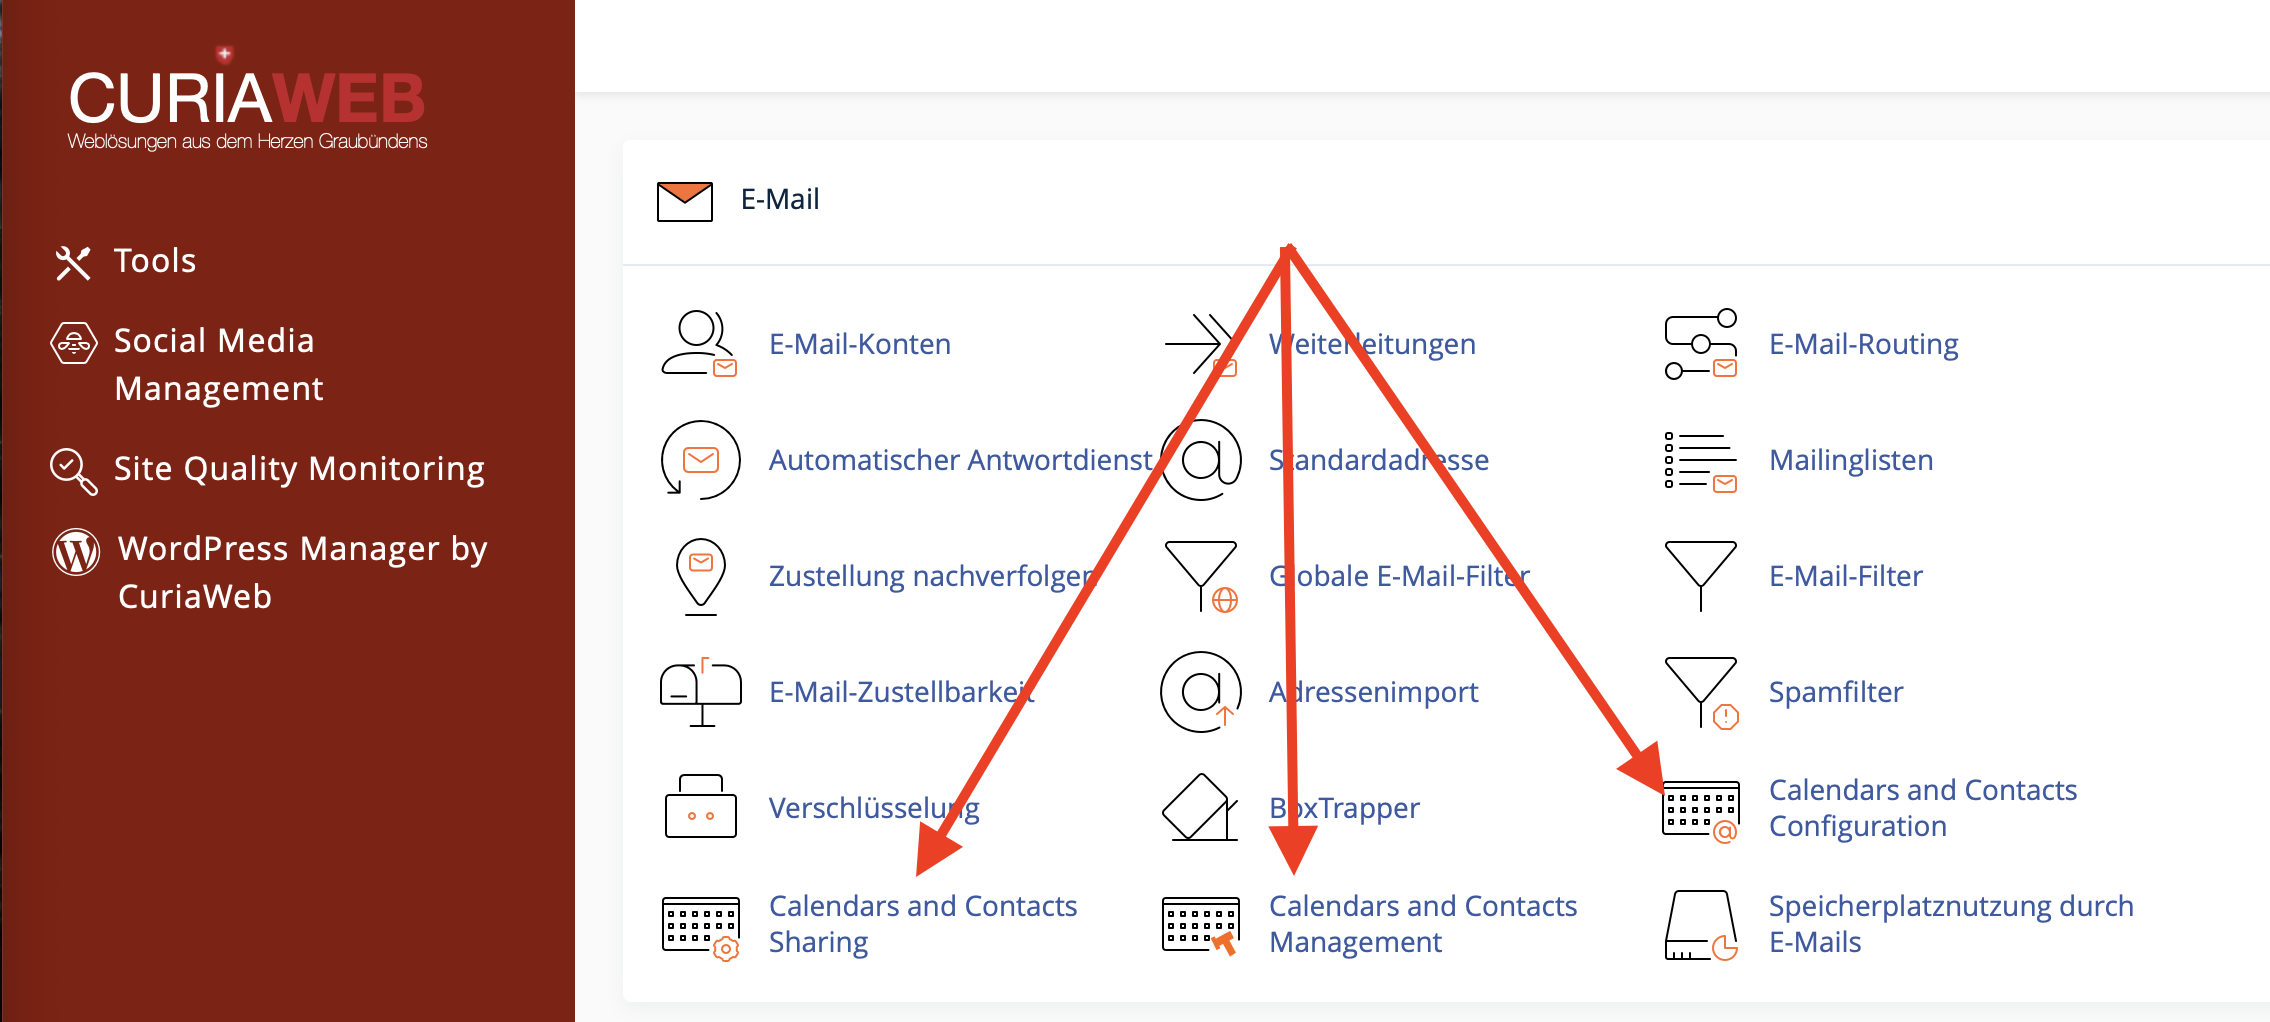
Where can I find the CalDAV and CardDAV login credentials?
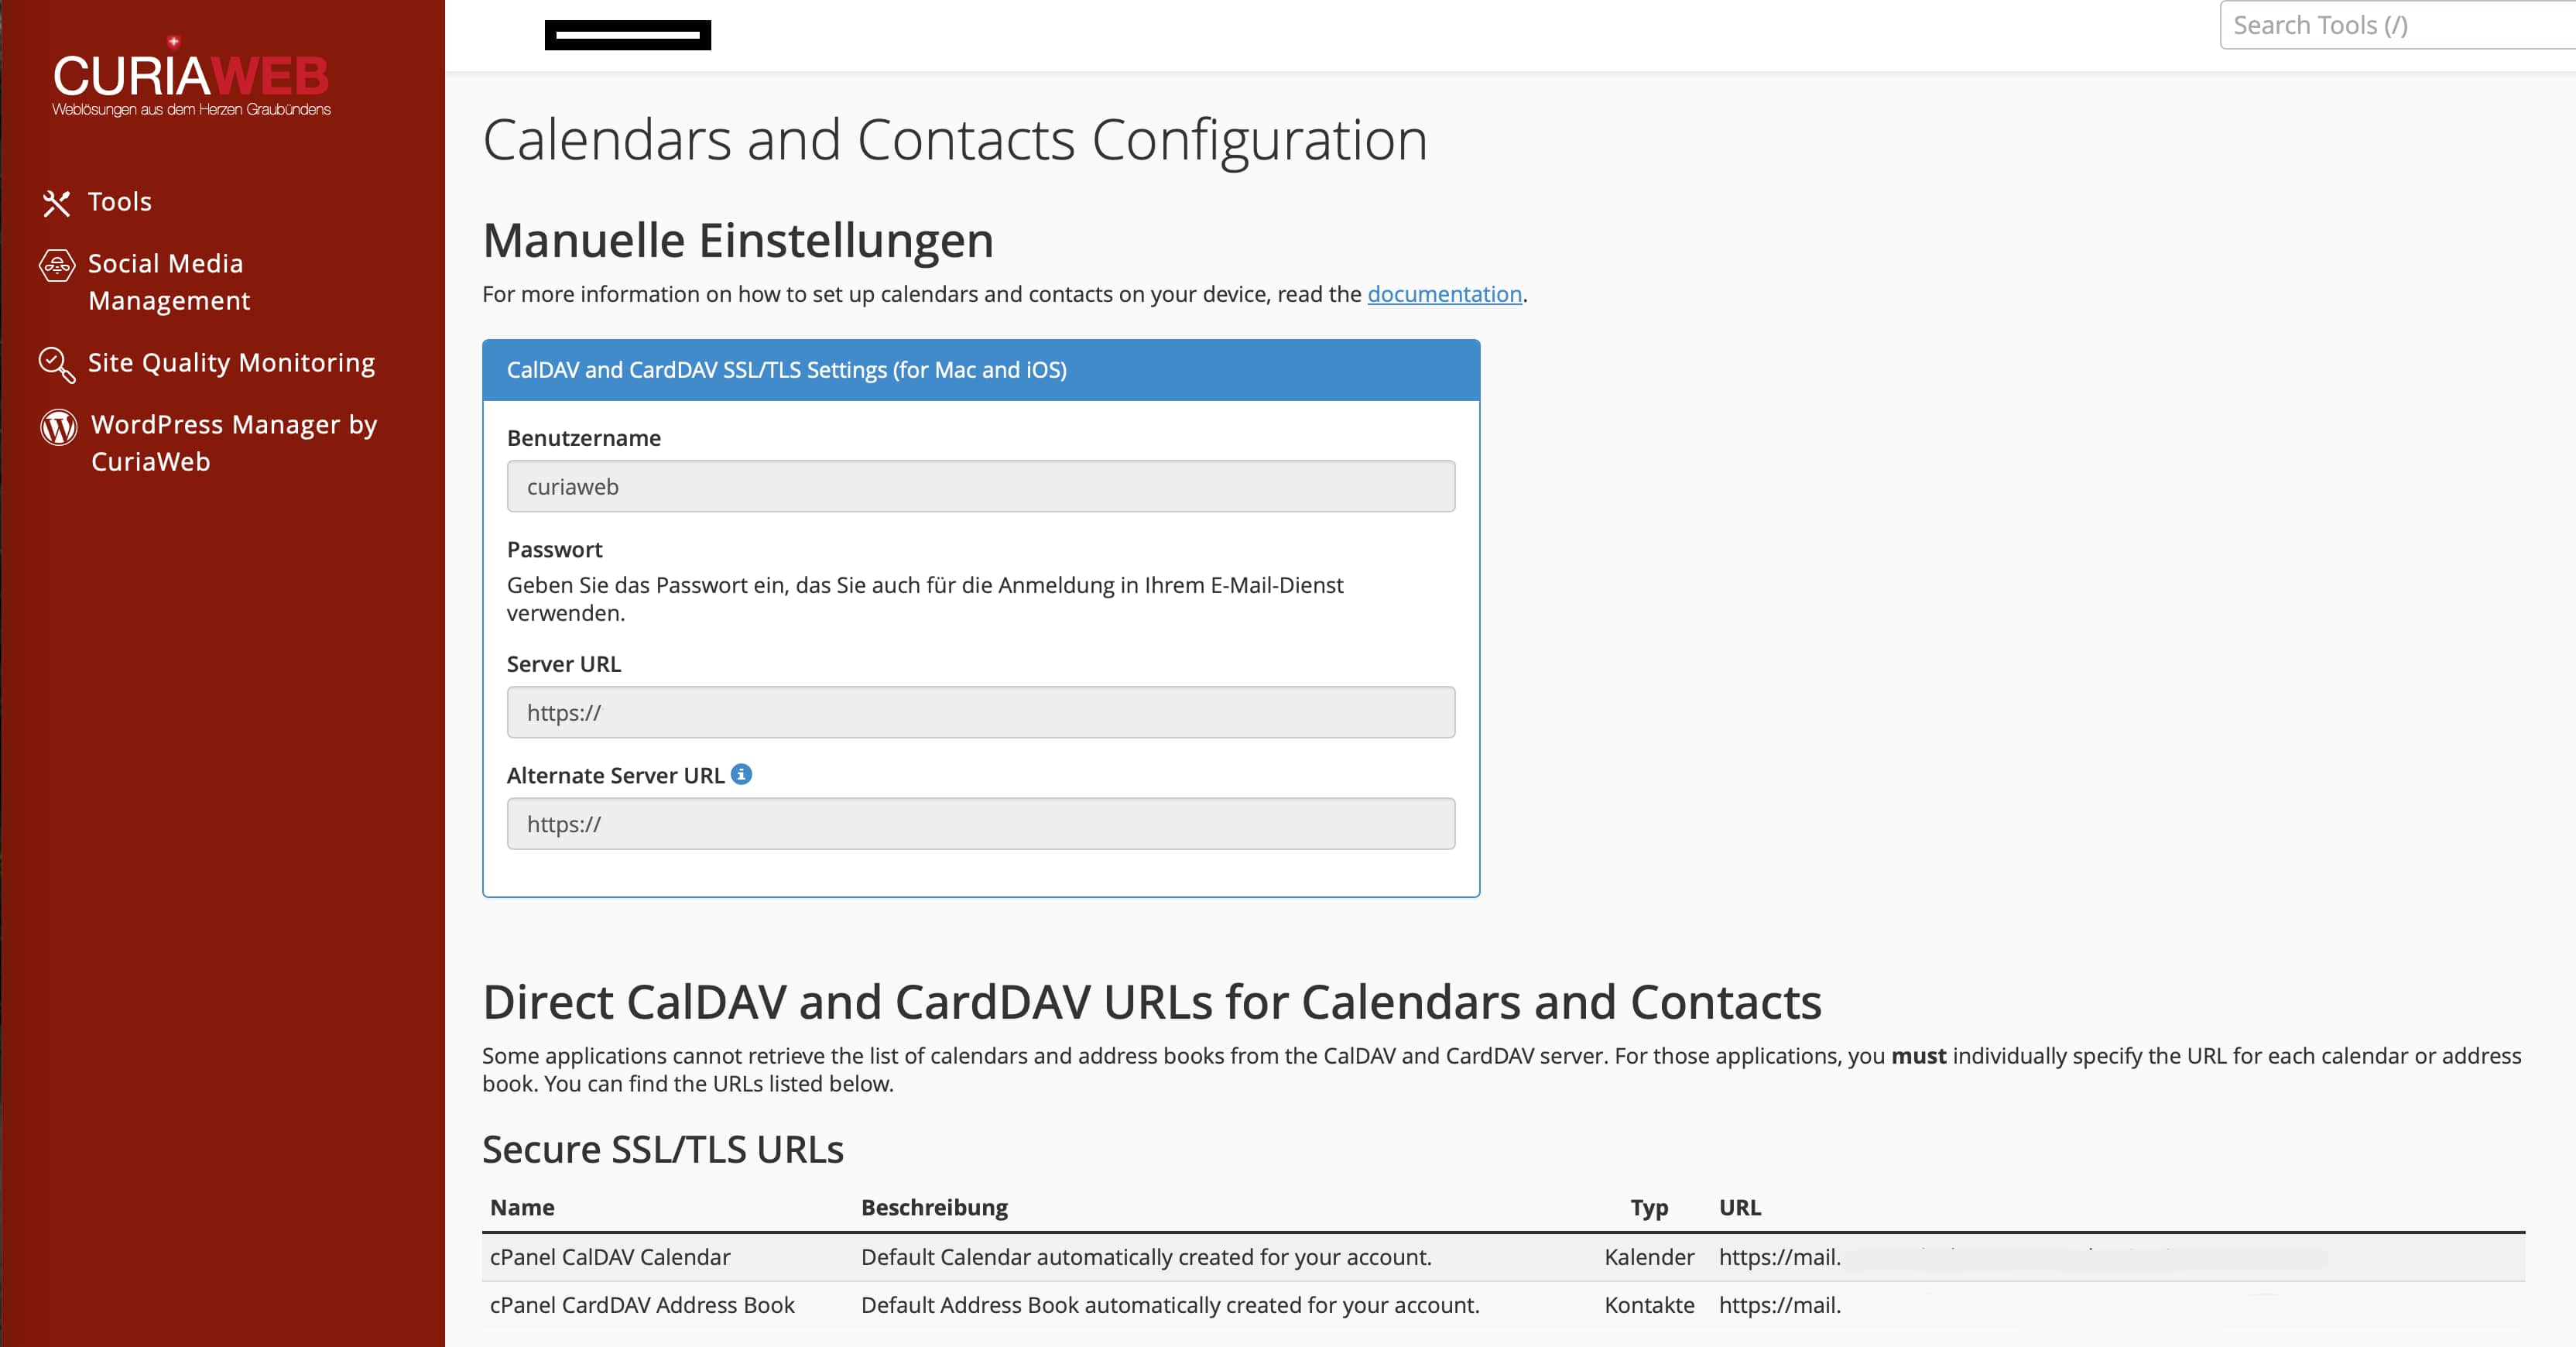
You can find your individual login credentials directly in the Webmail of your email account. To do this, log into webmail and open the section "Calendar and Contact Configuration". The server information matching your account will be displayed there.
Typical login credentials:
- Username: Your full email address
- Password: Password of your email or webmail account
- Server URL:
https://yourdomain.ch:2080
Important:
Whenever possible, always use the server details displayed directly in your own webmail. The example address https://yourdomain.ch:2080 is for guidance only and must be replaced by your own domain or the address shown in your webmail.
Difference between Calendar and Contact Synchronization
CalDAV and CardDAV are often mentioned together, but they perform different tasks. When setting them up, you must therefore pay attention to whether you want to synchronize calendars, contacts, or both.
| Protocol | Purpose | Typical Content |
|---|---|---|
| CalDAV | Synchronize calendar | Appointments, events, calendar data |
| CardDAV | Synchronize contacts | Address books, names, phone numbers, email addresses |
If you want to sync both appointments and contacts, you will set up two separate accounts in many applications: one for CalDAV and one for CardDAV.
Setup on Apple iPhone and iPad
iPhone and iPad support CalDAV and CardDAV natively via iOS Settings. You do not need an additional app for this.
Setting up CalDAV Calendar on iPhone or iPad
- Open the Settings on your iPhone or iPad.
- Go to Mail or Apps > Mail, depending on the iOS version.
- Open Accounts.
- Tap Add Account.
- Select Other.
- Tap Add CalDAV Account.
- Enter the server, username, and password.
- Save the configuration.
Setting up CardDAV Contacts on iPhone or iPad
- Open the Settings.
- Go to Contacts or via Mail > Accounts, depending on the iOS version.
- Tap Accounts and then Add Account.
- Select Other.
- Tap Add CardDAV Account.
- Enter your server address, full email address, and password.
- Save the configuration.
For the server, enter the address displayed in your webmail. If the address is entered manually, a notation like yourdomain.ch:2080 may be required depending on the display. Be sure to use your own domain and not the placeholder from this article.
Setup on Apple Mac or macOS
Under macOS, calendars and contacts can also be added via System Settings or the System Settings app.
Setting up CalDAV and CardDAV under macOS
- Open System Settings or System Settings > Internet Accounts.
- Click on Add Account or Add Other Account.
- Select CalDAV Account or CardDAV Account depending on the desired function.
- Choose manual setup if necessary.
- Enter the server address, username, and password.
- Complete the setup and then check your calendar or contacts.
If automatic detection does not work, use the manual setup and enter the server address from the webmail configuration. Pay attention to the correct spelling of the domain and the specified port.
Setup in Thunderbird
Mozilla Thunderbird can manage calendars and address books in addition to emails. This makes Thunderbird particularly suitable for users who want to bundle email, calendar, and contacts in a single application.
Adding a CalDAV Calendar in Thunderbird
- Open Thunderbird.
- Switch to the Calendar section.
- Create a new calendar.
- Select On the Network.
- Enter the CalDAV address from the webmail configuration.
- Enter your full email address and password when Thunderbird prompts for it.
- Save the calendar and verify the synchronization.
Adding a CardDAV Address Book in Thunderbird
- Open the Address Book section in Thunderbird.
- Create a new address book.
- Select the option for a CardDAV Address Book.
- Enter the CardDAV address from webmail.
- Log in with your full email address and the corresponding password.
- Save the setup and check if contacts are displayed.
Setup on Android Devices
Many Android devices do not support CalDAV and CardDAV directly in every default app, or it may depend entirely on the manufacturer and the installed calendar or contacts app. Therefore, first check whether the app you are using supports CalDAV or CardDAV.
If your app supports these protocols, setup is usually done via the device's account management or directly within the calendar or contacts app. There you enter the server address, your full email address, and the password.
Note on Android:
Since Android is structured differently depending on the manufacturer, version, and app, the menu names may vary. The crucial point is that the app used supports CalDAV or CardDAV and that the server data is entered correctly.
Which data needs to be entered?
During manual setup, mostly identical fields are requested. The names may vary slightly depending on the device or program.
| Field | Entry |
|---|---|
| Server | Server address from the webmail configuration, e.g., https://yourdomain.ch:2080 |
| Username | Full email address, e.g., info@yourdomain.ch |
| Password | Password of the email or webmail account |
| Protocol | CalDAV for calendars, CardDAV for contacts |
| SSL/TLS | If offered, use an encrypted connection |
Note on SSL Certificates and Security Warnings
During setup, it can happen that a device displays a security warning regarding the SSL certificate. This can happen, for example, if the entered server address does not exactly match the certificate address or if a device checks the connection particularly strictly.
Important for certificate warnings:
Only confirm security warnings if you are sure that the server address is correct and belongs to your hosting. If in doubt, check the information in webmail or contact CURIAWEB support.
Particularly on Apple devices, the synchronization of certain additional functions, such as reminders, may be restricted depending on the configuration and certificate check. For calendars and contacts, you should always use the configuration data displayed directly in webmail.
Common Problems and Solutions
Calendar or contacts are not syncing:
First check the username, password, and server address. Often the problem is due to a typo, a missing port specification, or a URL that was not copied exactly.
The password is not accepted:
Use the password of the affected email account. If you are unsure, reset the password in cPanel and then update it on all devices as well.
The device does not find the server automatically:
Select manual setup and enter the server address from the webmail. Automatic detection does not work reliably with every combination of devices.
Only calendars but no contacts are synced:
CalDAV and CardDAV are separate protocols. Set up an additional CardDAV account if you want to synchronize contacts.
Contacts but no appointments are synced:
Set up an additional CalDAV account and check whether the calendar is activated in the respective calendar app.
Entries appear duplicated:
Duplicate entries often occur when contacts or calendars are synchronized simultaneously from multiple sources. Check which accounts are active on the device and deactivate unneeded synchronization sources.
Best Practices for CalDAV and CardDAV
To ensure that synchronization works reliably, you should keep a few basic points in mind.
- Use only one main source: Avoid maintaining the same contacts across multiple separate accounts simultaneously.
- Copy server data exactly: Copy the details from webmail as accurately as possible.
- Use strong passwords: Calendars and contacts can contain sensitive business information.
- Check devices regularly: After making changes, check whether appointments and contacts continue to sync.
- Back up before major changes: Export or back up important contacts before removing or re-configuring accounts.
- Remove unused accounts: Old or duplicate synchronization accounts can lead to conflicts.
Data Privacy and Business Use
Calendars and contacts often contain confidential information, including customer data, phone numbers, internal appointments, and business notes. Therefore, use secure passwords and only set up synchronization on devices that you control.
For smartphones and computers used for business, it is also recommended to activate screen locks and quickly remove lost devices from all relevant accounts or change passwords.
Summary
With CalDAV and CardDAV, you can easily synchronize your email account's calendars and contacts between webmail, smartphone, tablet, and desktop applications. CalDAV handles appointments, while CardDAV handles contacts. The most important details, such as server address, username, and further configuration data, can be found directly in your webmail under "Calendar and Contact Configuration".
If you copy the server details correctly, use your full email address as your username, and enter the matching password, calendars and contacts can be reliably set up on many devices.
Do you need help with CalDAV or CardDAV?
CURIAWEB support is happy to assist you if calendars or contacts are not synchronizing correctly or if you cannot find the right server data.
Create Support Ticket